

Raleigh Roper Cross Bike
The Raleigh Roper is a $1500 disc brake equipped steel cyclocross bike meant for the serious commuter or abusive all-day rider that is more interested in the miles than the race weight. The full 4130 chromoly frame features not only a low-riding disc brake mount for rack and fender clearance, but an integrated headtube and one of the latest oversize bottom bracket systems, BB30, which has really begun to filter down from the ultra high end in the past year or two.
Beyond that, the bike has fender eyelets front and rear, rear rack mounts and some of the most overlooked braze-ons out there, a chain hanger and chainstay mounted spoke holder. The excellent Shimano 105 group makes up the shifting bits, benefiting from years of higher end trickle down, with Shimano R505 cable actuated disc calipers doing the actual stopping.
The bike shares the exact same geometry as Raleigh’s racier cyclocross offerings, making it a relatively aggressive, fast riding machine. Over a couple of months of riding hitting paved roads and railroad ballast, gravel paths and full-on singletrack, I fell in love with the handling. The bike just felt fast to me, more so than my much lighter road bike, encouraging me to ride longer and harder when I got outside of city limits. Dirt roads are some of my favorite to ride, and this bike truly excelled at tackling them.
The Shimano R505 disc calipers on the Roper took a couple of rides to fully break in as expected. While they are an upgrade from rim brakes in many respects, I did find them underpowered from the hoods which is admittedly the least powerful hand position in terms of braking power. When the going got wet or exceptionally muddy however, I never found myself wishing for rim brakes.
The very features that set the Roper apart also weigh it down—the complete bike is a portly 27.25 lbs. Given the price, overbuilt steel frame and fork, disc brakes and other accoutrements it’s not really a surprise, but it’s certainly noticeable. Dropping weight is possible, but losing significant pounds is going to take a lot of money. You’re far better off accepting the Roper for what it is and using it for the all-weather, all-roads conditions it’s meant for. If single speed is more your style, the exact same frame is available as the Furly, using a BB30 eccentric adapter and coming in at $830 retail.
Check out www.raleighusa.com
Trangia Spirit Burner Alcohol Camping Stove
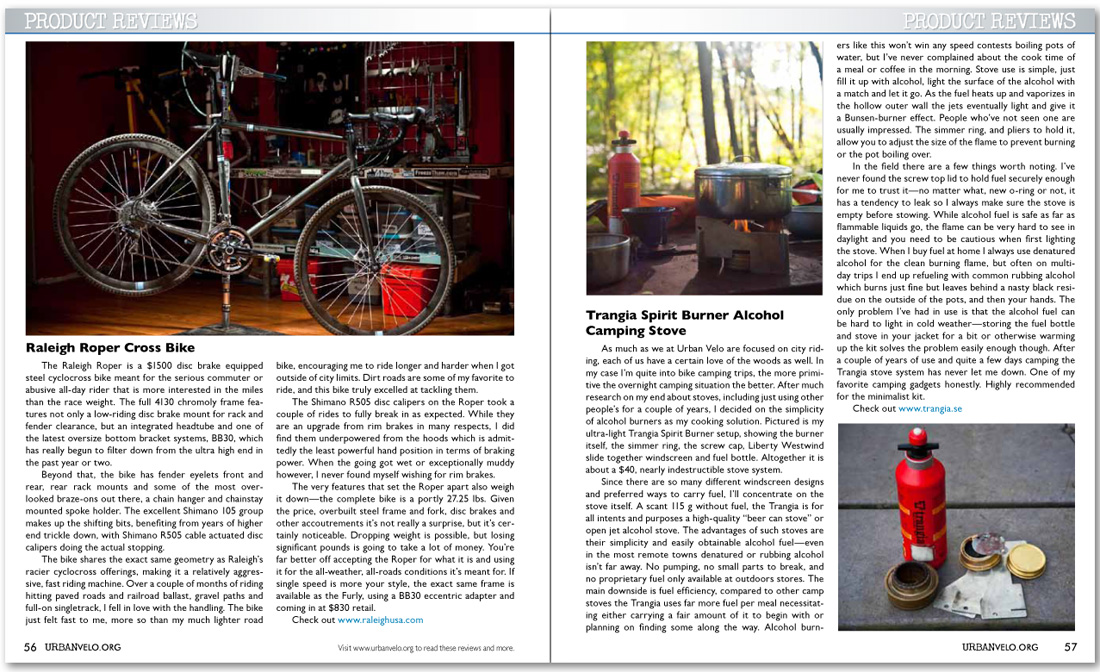
As much as we at Urban Velo are focused on city riding, each of us have a certain love of the woods as well. In my case I’m quite into bike camping trips, the more primitive the overnight camping situation the better. After much research on my end about stoves, including just using other people’s for a couple of years, I decided on the simplicity of alcohol burners as my cooking solution. Pictured is my ultra-light Trangia Spirit Burner setup, showing the burner itself, the simmer ring, the screw cap, Liberty Westwind slide together windscreen and fuel bottle. Altogether it is about a $40, nearly indestructible stove system.
Since there are so many different windscreen designs and preferred ways to carry fuel, I’ll concentrate on the stove itself. A scant 115 g without fuel, the Trangia is for all intents and purposes a high-quality “beer can stove” or open jet alcohol stove. The advantages of such stoves are their simplicity and easily obtainable alcohol fuel—even in the most remote towns denatured or rubbing alcohol isn’t far away. No pumping, no small parts to break, and no proprietary fuel only available at outdoors stores. The main downside is fuel efficiency, compared to other camp stoves the Trangia uses far more fuel per meal necessitating either carrying a fair amount of it to begin with or planning on finding some along the way. Alcohol burners like this won’t win any speed contests boiling pots of water, but I’ve never complained about the cook time of a meal or coffee in the morning. Stove use is simple, just fill it up with alcohol, light the surface of the alcohol with a match and let it go. As the fuel heats up and vaporizes in the hollow outer wall the jets eventually light and give it a Bunsen-burner effect. People who’ve not seen one are usually impressed. The simmer ring, and pliers to hold it, allow you to adjust the size of the flame to prevent burning or the pot boiling over.
In the field there are a few things worth noting. I’ve never found the screw top lid to hold fuel securely enough for me to trust it—no matter what, new o-ring or not, it has a tendency to leak so I always make sure the stove is empty before stowing. While alcohol fuel is safe as far as flammable liquids go, the flame can be very hard to see in daylight and you need to be cautious when first lighting the stove. When I buy fuel at home I always use denatured alcohol for the clean burning flame, but often on multi-day trips I end up refueling with common rubbing alcohol which burns just fine but leaves behind a nasty black residue on the outside of the pots, and then your hands. The only problem I’ve had in use is that the alcohol fuel can be hard to light in cold weather—storing the fuel bottle and stove in your jacket for a bit or otherwise warming up the kit solves the problem easily enough though. After a couple of years of use and quite a few days camping the Trangia stove system has never let me down. One of my favorite camping gadgets honestly. Highly recommended for the minimalist kit.
Check out www.trangia.se